Corrugated Metal Wood Fence: How to Build This Hybrid in Anchorage
A corrugated metal wood hybrid fence pairs steel panels with a cedar or treated lumber frame. The metal gives you full privacy and a surface that shrugs off snow load. The wood frame softens the look so the fence fits a new build or a renovated yard instead of looking like a storage lot. If you have already decided on this hybrid style for your Anchorage property, this guide walks you through the build step by step, from layout to the last trim board.
This matters here more than in most places. Anchorage ground moves with frost heave, the install season is short, and snow sits against fence lines for months. A hybrid fence done right handles all three. Done wrong, the posts lean by the second spring and the panels oil-can in the wind. Here is how to get it right the first time.
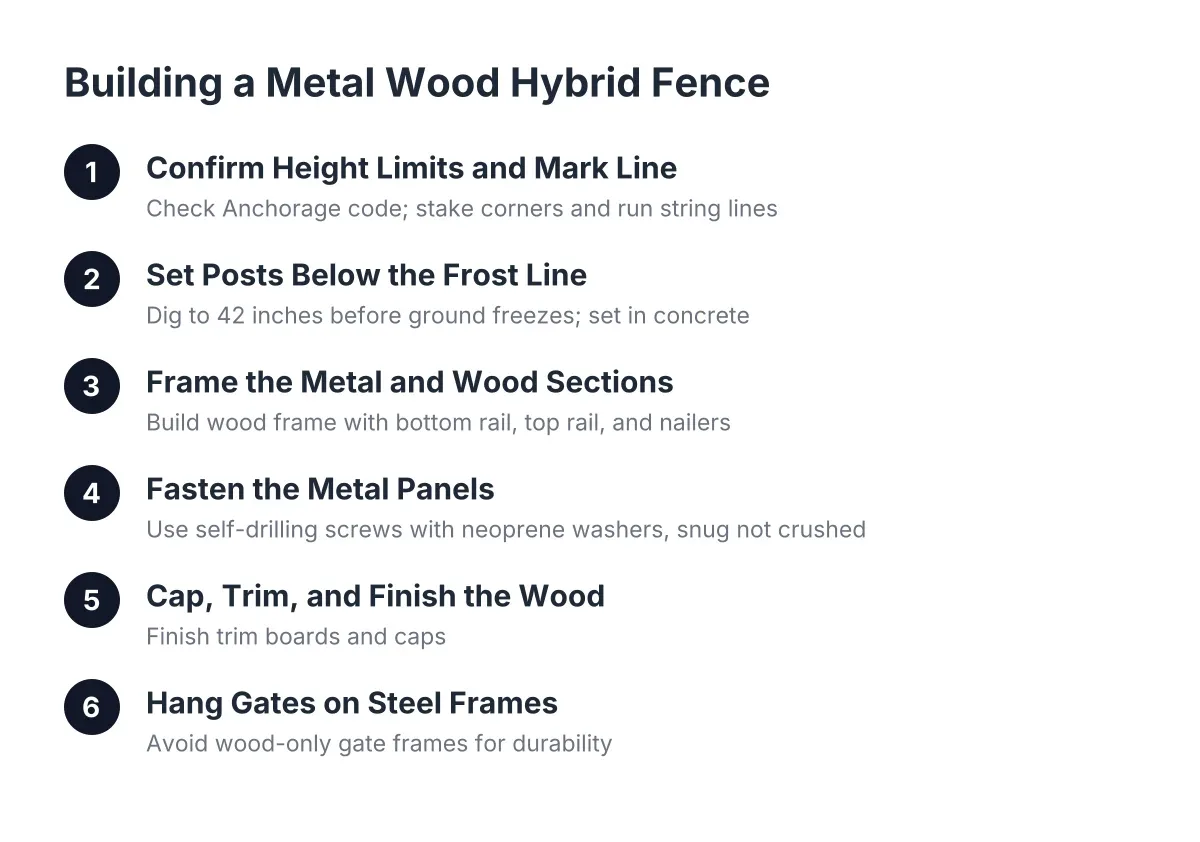
Step 1: Confirm Height Limits and Mark Your Fence Line
Before anyone digs, check what the municipality allows. Anchorage Municipal Code sets front-yard residential fence height limits at 4 feet in most zones, rising to 6 feet in R-6, R-8, and R-9 districts, according to the Municipality of Anchorage. Most corrugated metal privacy fence designs run 6 feet tall, so plan that height for side and back yards, not the front.
Next, call for utility locates and wait for the marks. Then stake your corners, run string lines between them, and walk the full run. Look for grade changes, trees, and spots where snow gets plowed or shoveled against the line. Those pressure points need stronger framing, not an afterthought.
If you manage multiple rental properties, this step is where you also confirm the property line against the plat. A fence set on the wrong side of a line between two of your buildings is a cheap fix on paper and an expensive one in steel.
Step 2: Set Posts Below the Frost Line Before the Ground Freezes
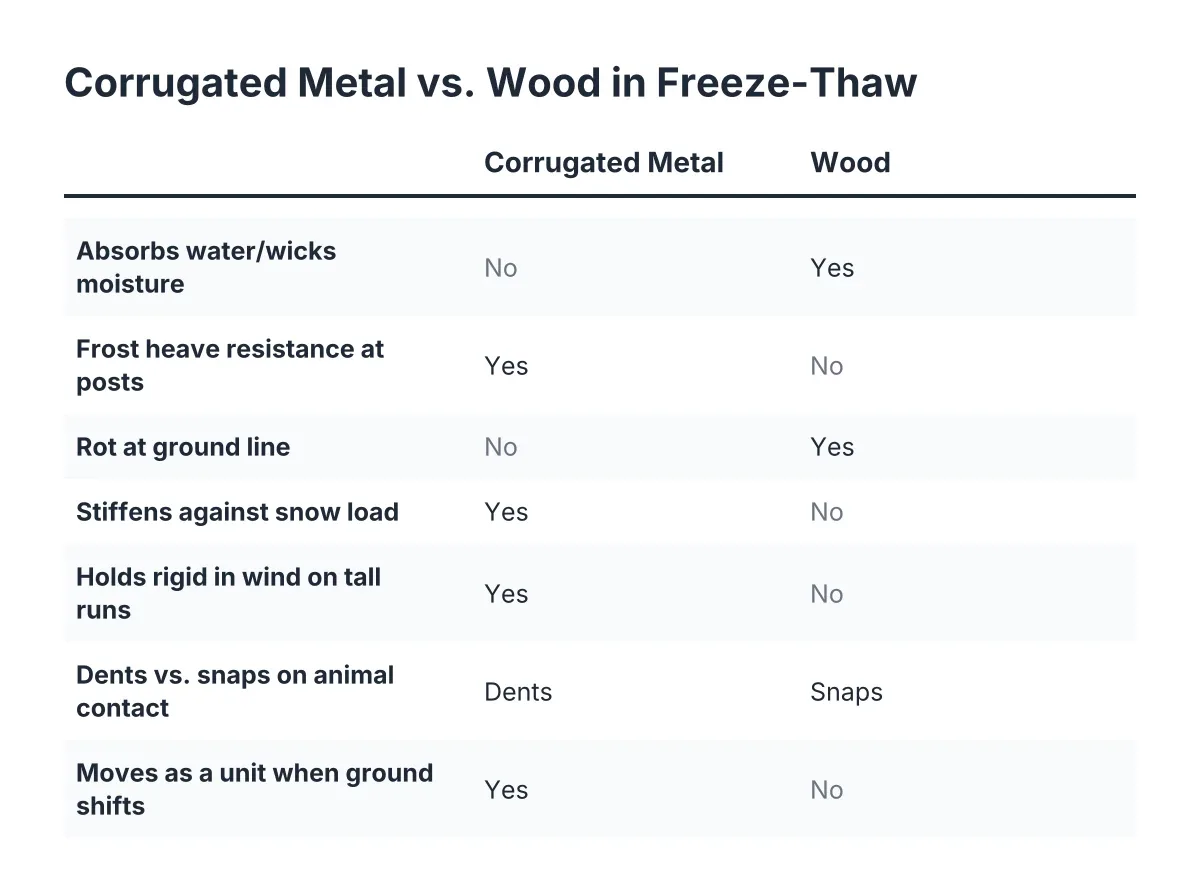
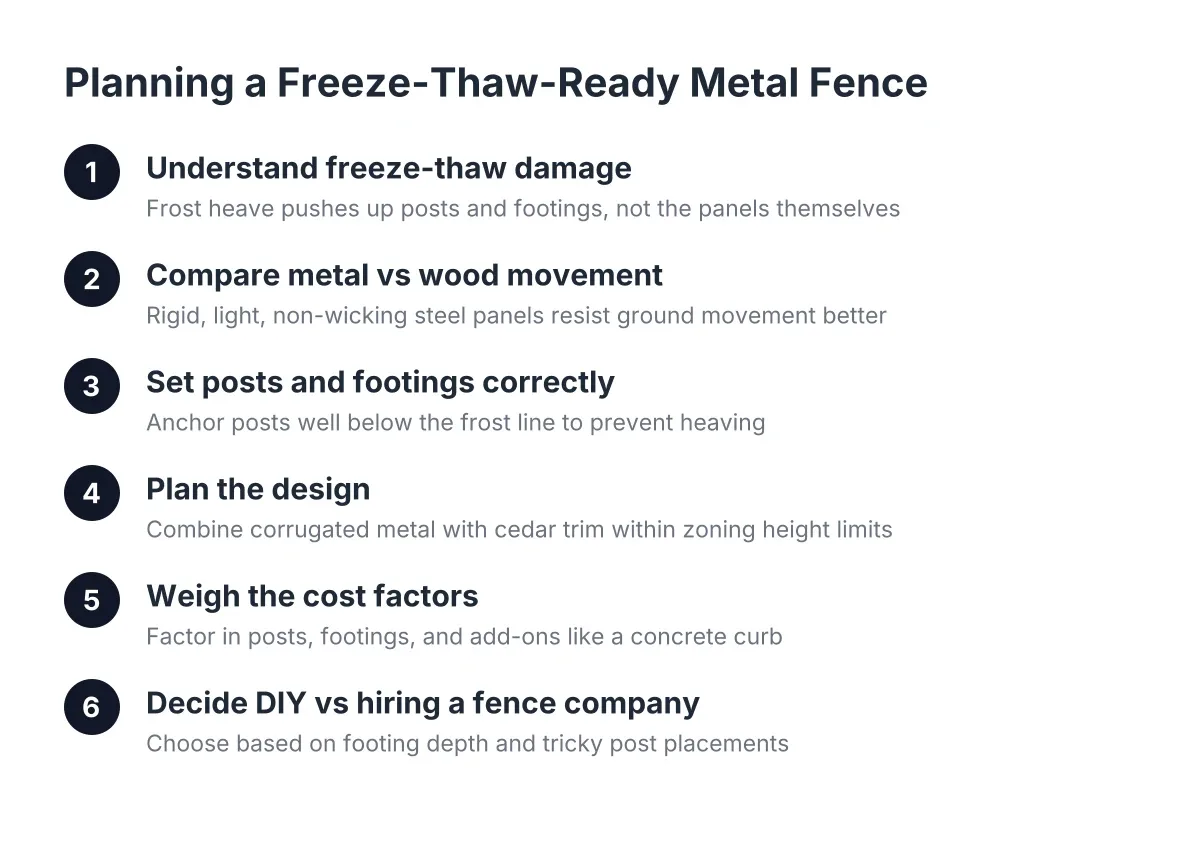
Posts are the whole game in Anchorage. Freeze-thaw cycles grab shallow footings and lift them a little more each winter. Anchorage's building code amendment sets the minimum exterior footing depth at 42 inches below finished grade for frost protection, according to PermitsGuide.com; treat deep post holes as the standard for this kind of work, and confirm the exact requirement for your fence with the municipality or your fence company.
For a hybrid fence, you have two good post options:
- Galvanized steel posts wrapped or boxed in cedar later. Steel resists rot at the ground line and handles wind load on a solid metal panel better than wood alone.
- Treated 4×6 wood posts if you want wood showing top to bottom. Size up from a 4×4; a solid corrugated panel catches wind like a sail, and a privacy fence here also takes months of snow load leaning against it.
Set posts in concrete, crown the concrete away from the post so meltwater sheds, and keep spacing tight, around 6 feet on center rather than 8. Tighter spacing stiffens the whole run. If an old chain link or steel post line already exists on the property and the posts are sound and deep, a fence contractor can sometimes work new posts between them; reused steel posts tied into a new frame can make the fence stiffer against wind than a from-scratch build of the same height.
Timing matters too. Digging 42-inch holes in frozen ground is slow and costly. Schedule post-setting for the thawed months and let panel work run later if the season gets tight.
Step 3: Frame the Corrugated Metal and Wood Fence Sections
The frame is what separates a sharp metal wood hybrid fence from a lean-to. Build a full wood frame around each metal panel: a bottom rail, a top rail, and vertical nailers at each post. Cedar reads best against steel and matches the cedar fence work common on newer Anchorage builds; treated lumber works where budget leads.
Keep the bottom rail several inches off the ground. Soil contact rots wood and traps meltwater against the metal edge, and a small gap also gives plow berms and ice somewhere to go. In addition, a raised panel is easier to repair later without pulling the whole section.
If you are extending or tying into an existing wood fence, do not just butt the rails together. Overlap a scab board across both rail ends and fasten it with brackets so the old and new sections act as one structure. Loose joints are where snow load finds its first failure.
Choosing Panel Orientation for Your Metal and Wood Hybrid Fence
Run the ribs vertically for the classic look and the fastest water shedding, or horizontally for a modern lines-and-layers style that suits new construction. Horizontal runs need a vertical trim strip wherever panel ends meet; it covers the splice and cleans up the face. Either way, order panels cut close to final size. Field-cutting corrugated steel is doable with shears or a nibbler, but every cut edge needs paint or edge trim to stop rust.
Step 4: Fasten the Metal Panels the Right Way
Attach panels with self-drilling metal roofing screws that have bonded neoprene washers. Drive them snug, not crushed; an over-driven washer splits and lets water sit against the steel. Screw through the flat of the corrugation into the wood rails, and keep a consistent fastener pattern so the face looks intentional.
Leave a small expansion allowance at panel edges. Steel moves with temperature swings, and Anchorage gives it a wide range to move through. Panels screwed dead tight at 60 degrees will buckle or squeak at 20 below.
Overlap adjoining panels by one full rib and fasten through the overlap. This keeps sightlines closed for a true sheet metal privacy fence and stiffens the seam. On runs with both full and cut panels, place the cut sections in the least visible stretch of the yard and save full panels for the street side and patio views. Installers do this on every mixed job for a reason; it reads cleaner at no extra cost.
Step 5: Cap, Trim, and Finish the Wood
The top cap is what makes a metal wood hybrid fence look designed instead of assembled. Run a 2×6 or 2×8 cedar cap flat across the top rail, pitched or crowned so snow and rain shed off. The cap also covers the raw top edge of the metal, which is both a looks issue and a hand-safety issue near gates and walkways.
Add vertical cedar trim at each post to frame the panels, and consider a mid-height trim board on tall runs for extra dimension. Trim additions and custom details cost more because they take more material and labor, not because anyone is padding the estimate. Finally, seal or stain all cedar on every face before or right after install. Wood that goes into an Anchorage winter unsealed ages years in one season.
Step 6: Hang Gates on Steel Frames, Not Wood Alone
Gates fail first on any fence, and a metal-clad gate is heavy. Build gate leaves on welded or bolted steel frames, then clad them to match the fence. Hang them from steel posts set deeper and heavier than the line posts. A wood-framed gate carrying corrugated steel will sag within a couple of seasons, and on a rental property that sag becomes a recurring tenant complaint instead of a one-time gate installation.
Specify hinges and latches rated for the weight, and set the gate with ground clearance for packed snow and ice. A gate that drags in January gets forced, and forced gates become fence repair tickets.
Step 7: Budget the Job Honestly
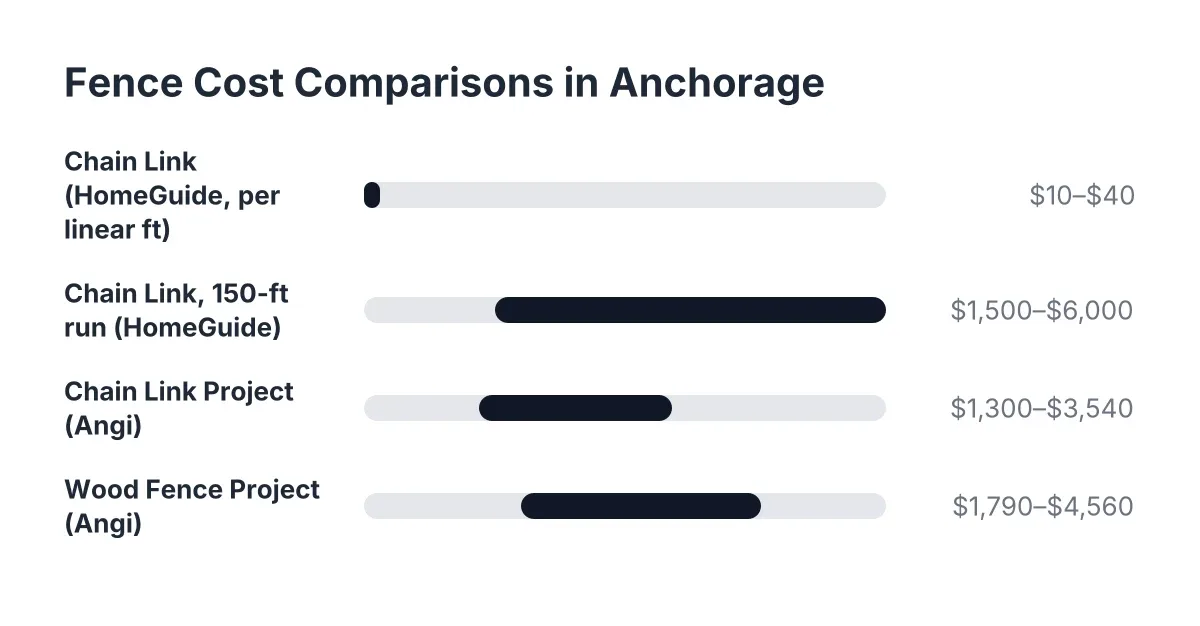
Cost for this style lands between a plain metal fence and a full custom cedar privacy fence, because you are buying both materials plus the labor to marry them. For scale, Angi reports chain link averaging $1,300 to $3,540 installed, with a comparable wood fence running $1,790 to $4,560, and wood typically costing 20% to 30% more than chain link. A hybrid corrugated build with cedar framing, deep posts, and a steel-framed gate sits above basic wood on a per-foot basis. Treat any 2026 figures you see online as starting points and get a written fence estimate for your actual site.
The cost drivers to discuss with your fence company:
- Panel gauge and finish, since heavier steel and factory color coatings cost more and last longer
- Post type and depth, because frost-line digging is real labor here
- Cedar versus treated framing and the amount of trim detail
- Gate count and gate frame construction
- Site access, slope, and old fence removal
Suppose a homeowner in a new South Anchorage subdivision needs about 120 feet of 6-foot privacy fence after the builder hands off the yard. In that scenario, a basic flat cedar fence might land in the mid four figures, while the metal wood hybrid with a capped frame and one steel-framed gate could run meaningfully higher, often by a third or more. The trade is upfront cost against a panel face that never rots, never needs restaining, and holds its look against snow load.
Step 8: Plan the Maintenance, Then Leave It Alone
This is the payoff step. The metal needs a rinse and an occasional check of fasteners; the wood needs restaining on a normal cedar schedule, every few years depending on exposure. Each spring, walk the line once. Check that posts are still plumb after breakup, that gate hardware moves freely, and that no cut metal edge has started to rust. Catching a heaved post in May is a fence repair; ignoring it until October is a fence replacement for that section.
One honest limitation: a corrugated metal fence is a solid wind barrier, and on exposed lots or steep grades the engineering matters more than the style. If your site catches hard wind off the inlet or the fence has to retain grade, bring in a professional before you commit to panel heights and post spacing. The hybrid look is worth building, and it is worth building once.
If you need fence installation, Anchorage Fence Co can help.
Prefer to talk it through? Call (907) 312-2862 — a quick call is usually the fastest way to get a straight answer for your situation.