Why Anchorage Fence Posts Heave in Winter and How to Install Them Right
If you have watched Anchorage fence posts heave an inch or two out of the ground by spring, you already know the problem. Frost gets under or around a post, lifts it during winter, and the post never settles back the same way. The fix is not luck. It is depth, drainage, and proper setting. This guide walks through the fence post installation depth decisions and the steps that stop heave before it starts, whether you are planning a new fence installation or deciding how to handle posts that already moved.
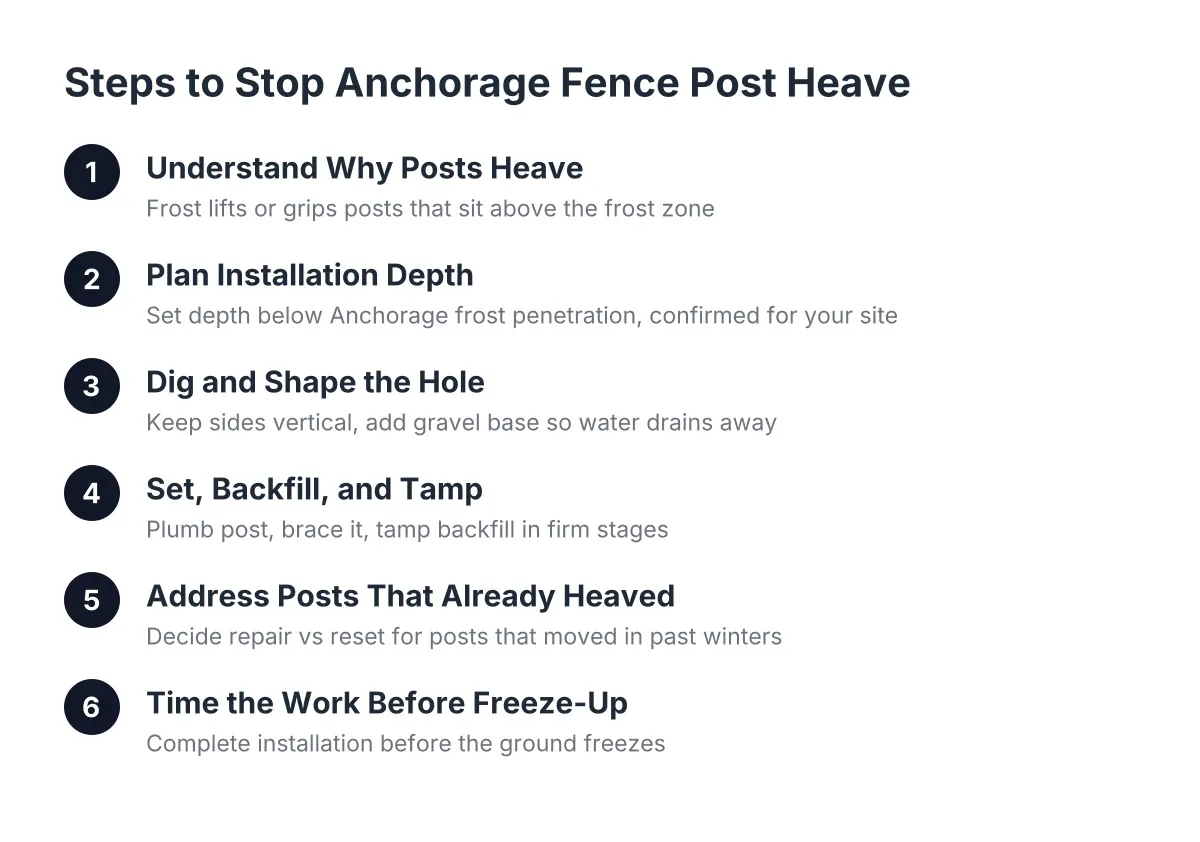
Step 1: Understand Why Anchorage Fence Posts Heave
Anchorage fence posts heave because water in the soil freezes, expands, and pushes against anything in its path. Two things make it worse: posts that do not reach below the frost zone, and footings shaped so frozen soil can grip them and lift. Fix those two conditions and most heave problems disappear.
Frost heave works in two ways. First, ice forming under a shallow footing pushes the whole footing up from below. Second, frozen soil can bond to the sides of a post or concrete footing and drag it upward as the ground swells, even when the bottom sits deep enough.
Anchorage soil and winters create both conditions. Freeze-thaw cycles in fall and spring repeat the lift-and-settle action over and over. A post that rises a little each winter rarely drops all the way back. Over a few seasons, gates stop latching, panels rack out of square, and the fence line looks like a wave.
This matters for budgeting too. A fence that heaves becomes a fence repair line item every spring. A fence set correctly the first time is a one-time cost. If you manage a portfolio of properties, that difference compounds across every site you own.
Step 2: Planning Fence Post Installation and Frost Depth in Anchorage
Depth is the single biggest decision in the whole project. The bottom of the post footing needs to sit below the depth where frost penetrates, so freezing soil cannot form ice under it and push up. Proper fence post installation depth around Anchorage frost conditions means accounting for how deep the ground actually freezes in your area.
Anchorage code gives a useful reference point for how seriously the municipality treats frost protection. According to PermitsGuide.com, Anchorage's building code amendment sets the minimum exterior footing depth at 42 inches below finished grade for frost-protected footing work. Fence posts are not foundations, and requirements differ by project, but that number tells you the ground here freezes deep. A hole dug to a Lower 48 habit will not cut it.
Treat depth as something to confirm for your specific site, not a number to copy from a national how-to article. Soil type, drainage, and exposure vary between an older in-town lot and a newer subdivision on the hillside. A fence contractor who works Anchorage ground will size the hole for the conditions in front of them, not for a generic chart.
While you are planning, check height rules too. The Municipality of Anchorage limits front-yard residential fences to 4 feet in most zones, with 6 feet allowed in some districts and up to 8 feet for non-sight-obscuring fencing like chain link in R-6, R-8, and R-9. Confirm your zone before you order material.
Step 3: Dig and Shape the Hole So Frost Cannot Grab It
Shape matters as much as depth. A footing that is wider at the top than the bottom gives frozen soil a shoulder to push against. The goal is the opposite: straight sides, or a hole that flares slightly wider at the bottom, so any upward force has nothing to grip.
Follow these points when digging:
- Keep the hole walls as vertical as you can; avoid a cone that narrows toward the bottom.
- Make the hole wide enough that concrete surrounds the post generously on all sides. A skinny collar of concrete cracks under lateral force and creates a wobble point at the break.
- Add a few inches of gravel at the base so water drains away from the post bottom instead of pooling and freezing under it.
- Do not assume more concrete automatically means more stability. An oversized blob with the wrong shape gives frost more surface to grab. Size and shape beat sheer volume.
In addition, think about water before you pour anything. A post hole in a low, wet spot will fight frost every winter no matter how well you set it. Where grading allows, route runoff away from the fence line.
Step 4: Set, Backfill, and Tamp the Posts Properly
Setting the post is where shortcuts show up years later. Drop the post to full depth, plumb it in both directions, and brace it so it cannot drift while the footing cures. The fence post installation depth you chose in the planning phase must be honored in execution.
If a post still sticks up above the planned height after it is driven or set, that is a warning sign. It usually means the post did not reach full depth. Do not trim the top and move on; the shallow end is the part frost will find.
Compaction matters as much as concrete. Posts loosen over time mainly because the material around them was never packed tight, and wind, water, and snow load work the gap wider every season. Whether you backfill with concrete, gravel, or native soil, build it up in stages and tamp each layer firmly before adding the next. Firm staged tamping is what holds the post plumb while everything sets.
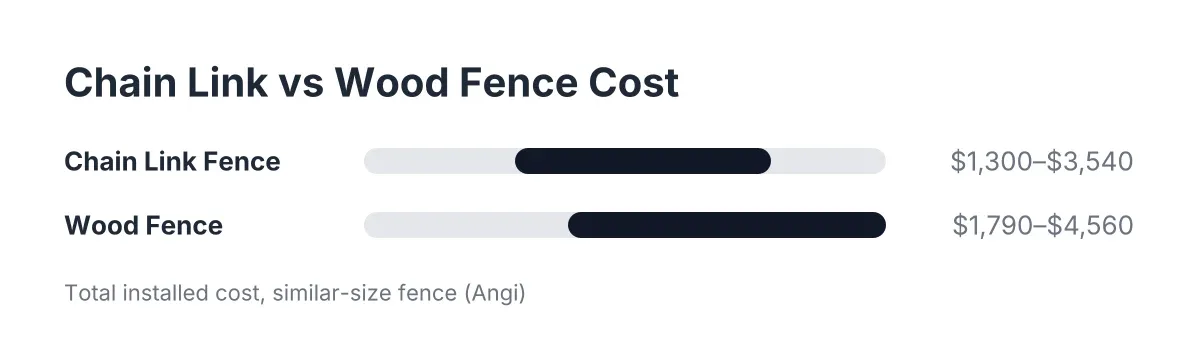
For context on material choice, chain link remains the workhorse for Anchorage perimeters, and it is not going anywhere; the Freedonia Group forecasts US chain link demand rising 1.0% per year to 225 million linear feet. Chain link also carries less snow load against the posts than a solid privacy fence, which matters when you are sizing footings.
Step 5: Decide What to Do With Posts That Already Heaved
Not every heaved or failing post needs full excavation. A homeowner's first instinct when a wood fence post rots or lifts is often to rip out the post and its concrete footing and start over with steel. Sometimes that is right. Often it is not the most practical move, especially on recent footings; concrete set within the last year or two grips hard and fights removal, while older footings can pop out with less effort.
An interim repair that preserves the existing footing can keep a sagging cedar fence standing now, and the money spent is not wasted; it carries the fence until a planned fence replacement with steel posts later. For a property manager, that turns an emergency into a scheduled capital item.
Here is an illustrative scenario. Suppose a manager runs a 40-unit complex in Midtown with a chain link perimeter where a dozen posts have lifted and the gates no longer latch, and an inspection is coming. In that scenario, the practical plan is usually to reset or sleeve the worst posts now, correct drainage along the low section, and budget the full line for replacement in the next cycle. A fence company that bids formally and invoices on terms can price both phases in one fence estimate so the owner sees the whole picture.
Tight spots call for creative setting too. Where a post butts against a neighboring fence or a tree and a full hole is impossible, a reinforced approach works: a metal pipe set deep with the finish post sleeved over it.
Step 6: Time the Work Before the Ground Freezes
The install season in Anchorage is shorter than the calendar suggests. Once the ground freezes, digging to proper depth gets slow, expensive, or impossible until breakup. Plan fence installation so post holes are dug and footings cured before deep freeze, which generally means committing to a schedule by late summer or early fall for the 2026 season.
Therefore, if you are comparing bids now, ask each fence contractor the same questions: how deep they set posts on your soil, how they shape and drain the hole, how they tamp and backfill, and what they do differently for a solid privacy fence versus chain link. Fence companies working in Anchorage will answer those in plain terms. Vague answers about depth are the biggest red flag in the whole process.
One honest limitation: no installation method stops all ground movement in every soil. Some lots sit on wet, frost-prone ground where even a deep, well-drained footing moves a little. If your site has standing water, questionable fill, or a slope, have a professional look at the ground before anyone prices the fence.
Get the depth right, shape the hole right, drain it, and tamp it. Do those four things and the question of why Anchorage fence posts heave becomes someone else's problem, not yours.
If you need fence installation in Anchorage, AK, Anchorage Fence Co can help.
Prefer to talk it through? Call (907) 312-2862 — a quick call is usually the fastest way to get a straight answer for your situation.